
“I don’t want my website to look better”...said no one ever.
Of course we want to make things look cool. Websites are judged within seconds so making our web pages look sweet is almost a necessity.
Adding CSS is a great way to make your site look more professional and on brand, while also adding a personal touch. CSS, or Cascading Style Sheets, is a coding language used to describe how HTML elements should appear on a page.

In this guide, we’ll go through the steps for how to add CSS to your WordPress website. We’ll cover how to access the CSS file, how to add and edit code, and how to save your changes. With the help of this guide, you can give your website a personalised and professional look. So, let’s get started!
What is CSS and why use it?
CSS, or Cascading Style Sheets, is a language used for styling and formatting web content. It’s used in conjunction with HTML, which defines the content and structure of a website, and allows for more flexibility and customisation in terms of design.
CSS on websites became popular after website owners realised the potential of applying style sheets to their websites. Before that, HTML was the only coding language used on websites. The problem with HTML, however, is that it didn’t have any built-in functions for formatting text. To make the text look better, website owners would have to use excessive <br> tags (line breaks), creating what is called “spaghetti code.” CSS was developed to solve this problem and it provides website owners with a way to format text without overusing HTML.
One of the main benefits of using CSS is that it separates the content and the presentation of a website, making it easier to make changes and updates to the design without affecting the actual content. This can save time and resources, especially for larger websites with a lot of content.
CSS also allows for more consistent and professional-looking design across a website. Instead of using inline styling or cluttered HTML code with numerous formatting tags, CSS allows you to define a set of styles that can be applied to multiple elements on the site. This not only makes the code easier to read and maintain but also ensures a cohesive and polished look for the website.
In addition, CSS is also used to create responsive design, which means that the layout and styling of a website can adjust to fit different screen sizes and devices. This is important in today’s world where people access websites from a variety of devices, including smartphones, tablets, and laptops.

How to find the CSS selector of the page element you want to change
When you add CSS code to your WordPress website, you’ll have to know the selector of the element you want to change. The selector is a string of letters that describe the part of your page you want to change. This can be a button, an image, or even a section of text.
There are a few ways to find the selector of the element you want to change:
Method 1: View the all of the page source code
The easiest way to find the selector of the element you want to change is to view the page code in your browser. To view the page code in your browser:
- Right-click on the page, select “View Source”, and then choose “View page source”.

- Once you’re inside the page code, look for the <div> or <span> tags. The <div> and <span> tags are used to add styling to different parts of your page. <div> and <span> are used to style a section of your page, and tags are used to style a single item on your page, such as a button.

- Once you find the <div> or <span> tag you want to change, you’ll be able to see what its selector is. This will show you what part of your page you can change. In the example above, the parent <div> has the selector (class) of ‘is-layout-flex’ and ‘wp-block-buttons’. Shown as:
<div class="is-layout-flex wp-block-buttons">
Method 2: Inspect your page using your browsers page tools
Inspecting CSS selectors on a web page can help you understand how a website is structured and how its styles are applied.
Here’s a simplified guide for inspecting CSS selectors using common browsers:
- Google Chrome, Firefox, Safari, and Microsoft Edge:
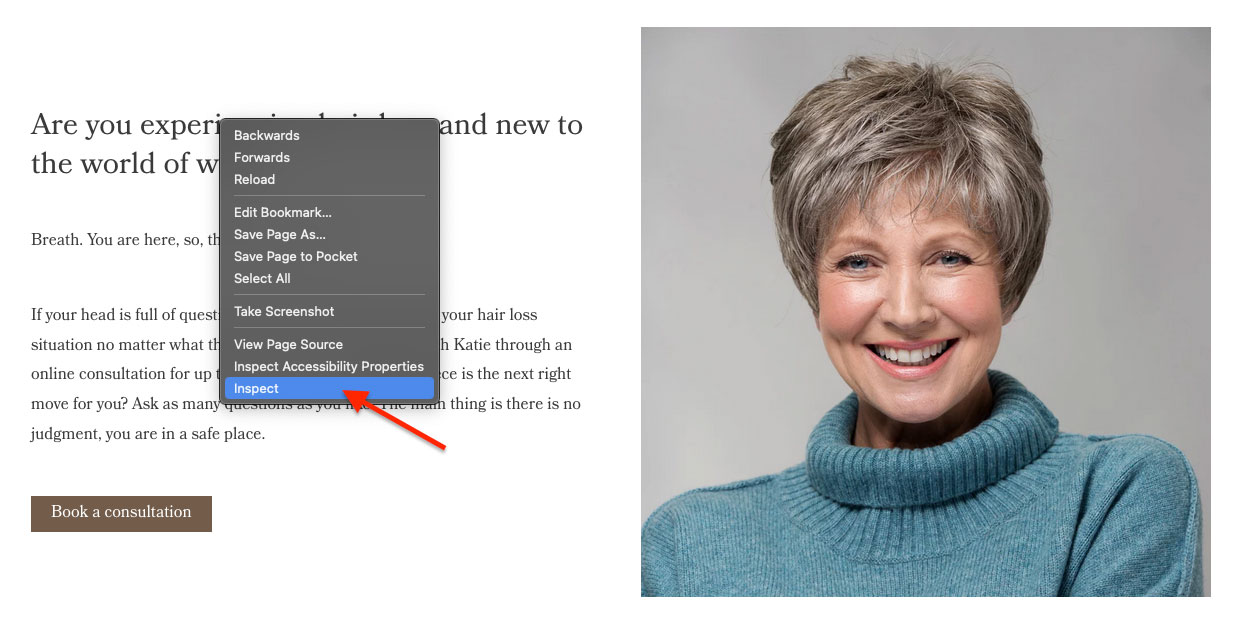
- Right-click on the element you want to inspect and select “Inspect” or “Inspect Element.”
- Alternatively, you can use the keyboard shortcut
Ctrl + Shift + I(Windows) orCmd + Shift + I(Mac) to open the Developer Tools. - Once the Developer Tools are open, you will see the Elements tab, which allows you to view and edit the HTML and CSS of the page.

- You can use the cursor to hover over elements in the HTML to see the corresponding CSS that is being applied to it in the Styles or Rules tab.
- You can also use the select element icon to select an element on the page, and it will highlight in the HTML and show the corresponding CSS in the Styles or Rules tab.
Keep in mind that the process may vary slightly depending on your browser version.
Adding Custom CSS to your WordPress site using the Customizer
The easiest way to add CSS to your WordPress website is by using the WordPress Customizer. You can access the Customizer from the Plugins menu or from the Customize button in your WordPress admin sidebar. This is generally done the same way in most themes but can occasionally look different, or even not be present at all in some! You might want to check this before selecting the theme to build on.
Once you’ve added your CSS code, click “Update” to save your changes. That’s all there is to it!
![]() NOTE: Adding CSS in this fashion will add the CSS code inline at the top of your page source code. We don’t recommend adding CSS in the customizer as a permanent solution. It’s great whilst developing your site, but we recommend moving the CSS code into your child theme before going live. It just helps to keep the page speed a fraction quicker.
NOTE: Adding CSS in this fashion will add the CSS code inline at the top of your page source code. We don’t recommend adding CSS in the customizer as a permanent solution. It’s great whilst developing your site, but we recommend moving the CSS code into your child theme before going live. It just helps to keep the page speed a fraction quicker.
Adding custom CSS to your WordPress site using a plugin
If you’d like to add custom CSS to your WordPress website without having to use the WordPress Customizer, you can use a plugin.
There are many WordPress plugins that can help you edit CSS on your WordPress site. Here are a few options:
- Simple Custom CSS: This plugin allows you to add custom CSS to your site without modifying your theme’s stylesheet.
- CSS Hero: This plugin lets you customize the appearance of your site by making changes to the CSS.
- Jetpack: This plugin includes a feature called Custom CSS that allows you to add custom CSS to your site.
- WP Add Custom CSS: This plugin allows you to add custom CSS to your site and also provides a visual interface for making changes to the CSS.
- Custom CSS Pro: This plugin allows you to add custom CSS to your site and includes a visual interface for making changes to the CSS.
- CSS Jockey: This plugin allows you to add custom CSS to your site and includes a visual interface for making changes to the CSS.
Adding Custom CSS to your WordPress site by editing the theme’s stylesheet
If you want to add custom CSS to your WordPress site by editing the theme’s stylesheet, you can do so by accessing your WordPress admin, clicking on “Appearance”, and then clicking on “Editor.” Once you’re inside the editor, click on “Theme Files”, and then select “style.css.” After you’re inside the stylesheet, you can add the CSS code you want to use. Just like when editing the stylesheet, you have to click “Update File” to save your changes. You can also use a plugin like Code Editor to edit the stylesheet for you. This way, you don’t have to deal with the code yourself.
Overall, this is our preferred way to add CSS to a website.
How to add inline CSS to specific pages or posts
To add inline CSS to a specific page or post in WordPress, you can do the following:
- Edit the page or post in the WordPress editor.
- Switch to the “Text” editor (rather than the “Visual” editor).
- Find the element to which you want to apply the inline CSS and add the “style” attribute to it.
- Inside the “style” attribute, add the CSS rules you want to apply.
For example, let’s say you want to change the color of the text in a paragraph to red on a specific page. Here’s how you would do it:
<p style="color: red;">This text will be red</p>
Alternatively, you can also use the “Custom Fields” feature to add inline CSS to a specific page or post. To do this:
- Go to the page or post editor in WordPress.
- Scroll down to the “Custom Fields” section.
- Add a new custom field with the name “css” and the value being the inline CSS you want to apply.
For example, you could add the following custom field:
Name: css Value: <style>p { color: red; }</style>
This would apply the CSS rule “color: red;” to all paragraphs on the specific page or post.
How to troubleshoot and debug CSS code
If you run into issues while adding CSS to your website, there are a few troubleshooting methods you can use. It’s important to note that CSS is a complex language, so there will be some issues you can’t troubleshoot. However, if you follow some of these tips, you can troubleshoot most issues. The best way to troubleshoot CSS issues is to view the page code in your browser. If you’re having issues with styling a specific element, you can view the page code to find out the selector of the element. Once you know the selector, you can troubleshoot the CSS code.
If you’re having issues with the general styling of a page, such as a font or colour, you can use a plugin to troubleshoot the CSS for you. One example of a plugin you can use is the WordPress Debug Bar. Once you have the Debug Bar plugin installed, you can access the CSS tab to view all the CSS on your site. From here, you can see the CSS code, as well as where it’s being applied, and where it’s missing. This helps you identify where the issue is occurring. You can also use the “Suppress” button to turn off CSS for specific elements. This way, you can see if the issue still occurs without the CSS applied.
Another useful debugging tip is to use online CSS editors. These sites let you enter your CSS code and then show you how it’s being applied on a page. This can be a great way to troubleshoot issues and learn more about how CSS works.
Useful CSS tutorials and resources
Now that you know how to add CSS to your WordPress website, it’s time to create the perfect design. If you’re new to CSS, it can be a bit overwhelming. However, don’t worry; CSS is a very learnable skill!
These resources are here to help you learn CSS and create the design you’ve always wanted.
– The W3C CSS Reference is a great resource for beginners to intermediate CSS coders. This website lists all the CSS properties and provides examples of how to use them.
– CSS-Tricks, created by CSS expert Chris Coyier, is another great website for learning CSS. This website includes tutorials, guides, and tips on using CSS.
– Smashing Magazine is a general design website that includes articles on CSS. This website includes tutorials, best practices, and tips on how to use CSS effectively in your designs.
– Codecademy is a popular online platform for learning coding languages, including CSS. They offer interactive lessons and projects to help you practice your skills.
– Udemy is an online learning platform that offers courses on a wide range of topics, including CSS. These courses are often taught by industry experts and offer a more in-depth learning experience.
– The CSS Zen Garden is a website that showcases the power of CSS by allowing designers to create their own styles for the same HTML page. This can be a great way to see how different designers approach CSS and get inspiration for your own designs.
– WP Tutorials is also another excellent resource to check out. Whilst not specific to CSS, the numerous tutorials available cover all the topics you’ll likely find useful in your journey to creating a better-looking website.
In addition to these resources, there are also many online communities and forums where you can ask questions, get help, and share your own tips and tricks with other CSS users. As you continue to learn and practice CSS, you will become more comfortable with the language and be able to create the designs you envision.
In summary…
To say CSS is an important part of any website is an understatement. It makes the design of your website come to life. In this guide, we’ve covered the basics of CSS and how to add it to your WordPress website. We’ve gone over what CSS is, why you should use it, and how to add CSS to your WordPress website. With the help of this guide, you can add custom CSS to your WordPress website to make your site look amazing.
Now, it’s time to get designing! Comment below to show us your designs.
