Configure your WordPress/WooCommerce site so that outgoing emails don’t go to your customers’ spam folders. We’ll also cover how to properly test your configuration, so you’ve got full confidence your emails are being delivered properly.
Here’s the process we’re going to cover…
- Send an email from our website to a Gmail email address
- If the email is delivered to the Gmail inbox properly, then…
- We’re all set – we don’t need to do anything
- Else…
- We need to go to our DNS domain-name control panel and add/edit the domain’s TXT/SPF record
- Go back to Step 1 and repeat
InformationIMPORTANT: For reference, we’ll use example.org as our site’s domain name and 123.123.123.123 for the web server’s IP address. You should swap these out for your site’s domain name and IP address.
Send a test message to a Gmail account
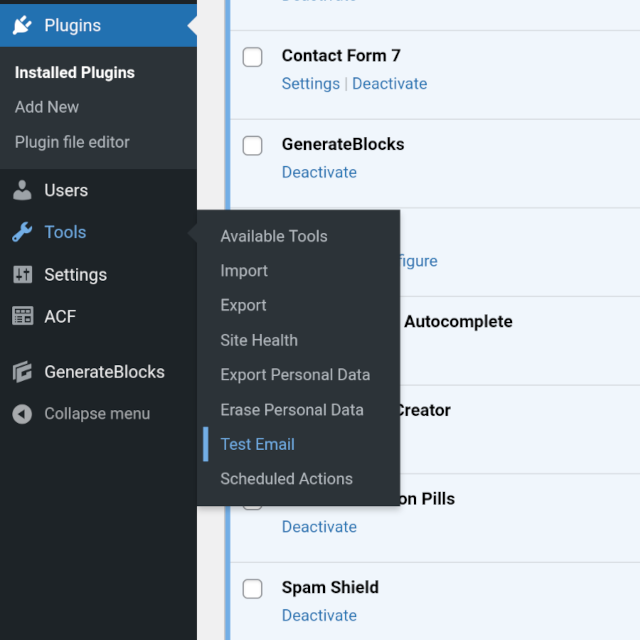
Temporarily install the WP Test Email plugin, go to Tools > Test Email and send a test email to a Gmail address.
I like to use Gmail because a lot of customers have personal Gmail addresses, so it’s a fair test of how things are working in the real world.
If the test email doesn’t land in your Gmail inbox, check the spam folder.
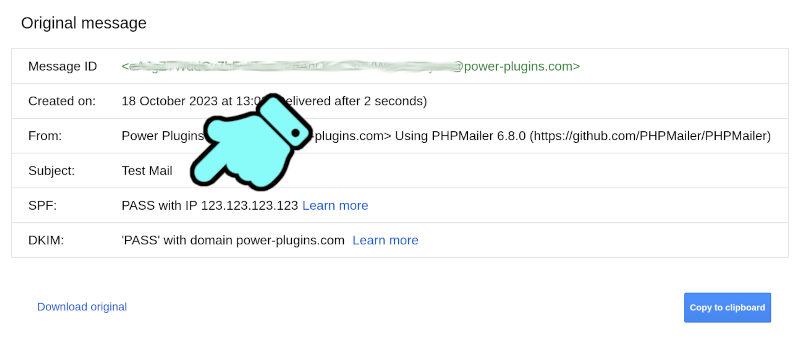
When you’ve opened the test email (where ever it ended up), click the three dots to the right and then “Show Original” to get the full version of the email (including the headers).

InformationIn this example, we’ve also passed “DKIM” checks, but that’s a bit more involved. Get your SPF checks working first.
If your email has passed Google’s SPF Checks, you can uninstall the WP Test Email plugin – it’s done its job and there’s no need to leave it installed on your site.
But if the email did not pass the SPF checks, you need to investigate your domain’s TXT/SPF record.
Create or update your domain’s TXT/SPF record
In your DNS domain-name control panel, find your TXT records and see if you already have a TXT/SPF record – if you do, it’ll start with v=spf1
- If you already have a TXT/SPF record, copy-and-paste it to somewhere safe so you can get back to where you started if you need to
- If you don’t already have a TXT/SPF record, create a new TXT record now. The host name needs to either be empty, or “@”. If your DNS provider needs an “@” to denote a root record, they will say something like “use @ to specify no-host name” (or similar). If in doubt, try leaving host name empty first. If it complains about missing a host name, try again with “@”
Now we can specify which servers are authorised to send emails.
If all emails for your domain are sent directly by your web server (i.e. your webs server is also your email server), just add ip4:123.123.123.123 after “v=spv1” and before “~all”.
ImportantBut if you use Easy WP SMTP to send emails via an SMTP relay, use your email server’s IP address instead of your website’s IP address. Using an external SMTP relay is generally discouraged, because you need to save an unencrypted version of your mail server’s password in your WordPress site’s database.
If your hosting company runs their own mail servers for you to use, they will tell you what your SPF record should be. But we still need to add your web server to that record. When this is the case, your standard TXT/SPF record will look something like this:
v=spf1 include:spf.my-hosting-provider.com ~allYou can add your web server’s IP address like this…
v=spf1 ip4:123.123.123.123 include:spf.my-hosting-provider.com ~allIf you’re using Microsoft Outlook.com as your email provider, your TXT/SPF record should look something like this:
v=spf1 ip4:123.123.123.123 include:spf.protection.outlook.com ~all…and if you’re using Google Workspace, this should help you out:
v=spf1 ip4:123.123.123.123 include:_spf.google.com ~allSave your changes and wait a couple of minutes.
ImportantEvery DNS domain-name company does things slightly differently. Sometimes you can save a TXT/SPF record and the world will “see it” immediately. But other providers might wait a few minutes before they process your changes. From experience, waiting 3-5 minutes after changing a TXT/SPF record is a useful thing to do.
What about the bit at the end of the TXT/SPF record?
The last part of the record tells the receiver what to do if a message hasn’t been sent by any of the authorised senders. In short, there are two options:
~all
-all
The first option is more permissive and called “soft fail”. It means that if a sender doesn’t pass the SPF checks, it can still be delivered to the recipient but it should be flagged as “suspicious”.
The second option is called “hard fail” and tells the receiving server it’s OK to discard/bounce any emails that do not pass the SPF checks.
Verify the SPF record is valid
When you’ve created/updated your TXT/SPF record, use a tool like MX Toolbox to check it’s worked. I like this one because you can enter your domain name, as well as the IP address of the server you want to verify.

You’ll see errors in the results if:
- There is no TXT/SPF record
- There are multiple TXT/SPF records
- You have syntax errors in the TXT/SPF record
- The IP address is not authorised to send emails on behalf of example.org
If you’re happy with the results from MX Toolbox, go back to the start, send another test message to Gmail and check the headers again.
Common mistakes
- Multiple TXT/SPF records set for a domain – a common mistake
If you’ve got multiple TXT/SPF records (multiple TXT records that being with “v=spf1…”), you can merge them together into a single record that starts with “v=spf1”, ends with “~all” and has your “include:…” and/or “ip4:…” fields in between. - Setting the TXT/SPF record to a host name (subdomain)
Make sure the host name is empty (or “@”). It’s easy to accidentally put your domain name into the host name field, but all that does is create a TXT/SPF record for “example.org.example.org”. - Leaving old fields in the TXT/SPF record
If your domain has been around for several years, and you’ve changed hosting/email provider a few times, it’s common to see a lot of unused fields in there. Usually you only need the IP address of your web server, and maybe the “include” field for Outlook or Google. If you see 3 or more “ip4” fields in there, check to see if they’re still required.
Rinse and repeat until the tests work
That’s all there is to it. It’s not about knowing any magical settings that just “make it work”.
It’s a process…
- Test your configuration with MX Toolbox
- Read the results of the test, and Google anything you don’t understand
- Adjust your TXT/SPF record accordingly
- Wait a couple of minutes
- Test again
- Confirm everything is working by sending a test email from your site to a Gmail account
…eventually, the tests will work and you can be confident everything is working properly 👍


