
Let’s configure MariaDB in XAMPP for Mac, Windows or Ubuntu. Although MariaDB should work right out of the box, there are a a few tasks we should complete before we use it for any projects. We’ll upgrade the back-end data structures, set a root password, and configure the DBeaver database management app.
InformationMariaDB is a database server that can run multiple databases. It is a drop-in replacement for the older MySQL database server. You’ll see “MySQL” and “MariaDB” used interchangeably, but on our XAMPP installation we’re always referring to our MariaDB server.
Upgrade and secure the DB server
MariaDB supports multiple username/password combinations to access the databases it hosts. There’s a special user called “root” that is the database system administrator. By default the root user does not have a password, so we need to fix that.
Launch the XAMPP Control Panel and start the MySQL (MariaDB) database server. Then follow the instructions for your operating system.
Upgrade and configure on Ubuntu
Open a terminal window and type the following, to ensure the database structure is up-to-date.
# Upgrade the database structures
sudo /opt/lampp/bin/mysql_upgrade
# Enter your regular Ububtu user-account password when prompted

# Run the script to start securing the installation
/opt/lampp/bin/mysql_secure_installation -u root
Enter current password for root (enter for none):  <<< Press "enter"
Enable unix_socket authentication? [Y/n]:          <<< n
Set root password? [Y/n]:                          <<< y
New password:                                      <<< Enter a good password here
Re-enter new password:                             <<< Same password as above
Remove anonymous users? [Y/n]                      <<< y
Disallow root login remotely? [Y/n]                <<< y
Remove test database and access to it? [Y/n]       <<< y
Reload privilege tables now? [Y/n]                 <<< y
...
Thanks for using MariaDB!
You can close the terminal window now.
Upgrade and configure on Windows
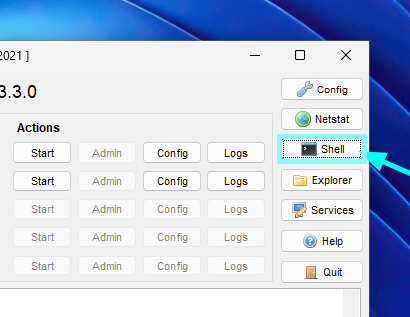
From the XAMPP Control Panel, click the “Shell” button to launch a terminal window in the correct folder.
# Upgrade the database structure
mysql_upgrade.exe

# Connect to the database server
mysql -u root
InformationNotice how you were not asked to enter a password when connecting to the database server.
This will put you into an interactive database server shell, where you can set a root password (replace “YOUR-PASSWORD” with the root password you want to use):
ALTER USER 'root'@'localhost' IDENTIFIED BY 'YOUR-PASSWORD';

FLUSH PRIVILEGES;

exit
Test that it works properly by connecting to the database server as root, using your new password.
REM Connect to the database server as "root".
REM Enter your root database password when prompted.
mysql -u root -p
If that works, you can exit the MySQL shell, then exit the terminal window too.
Upgrade and configure on Mac
Open a terminal window and type the following to update the data structures:
# Upgrade the database structures
sudo /Applications/XAMPP/bin/mysql_upgrade
# Enter your regular Mac user-account password when prompted

# Run the script to secure the installation
/Applications/XAMPP/bin/mysql_secure_installation -u root
Enter current password for root (enter for none):  <<< Press "enter"
Enable unix_socket authentication? [Y/n]:          <<< n
Set root password? [Y/n]:                          <<< y
New password:                                      <<< Enter a good password here
Re-enter new password:                             <<< Same password as above
Remove anonymous users? [Y/n]                      <<< y
Disallow root login remotely? [Y/n]                <<< y
Remove test database and access to it? [Y/n]       <<< y
Reload privilege tables now? [Y/n]                 <<< y
...
Thanks for using MariaDB!
You can close the terminal window when that’s finished.
Install and configure DBeaver
DBeaver is a desktop app for managing database servers and interacting with the tables & queries. It’s free, and is much easier to use than phpMyAdmin for most admin tasks.
If you’re running Ubuntu, just open the Software Centre and install DBeaver in a couple of clicks. It’s the same on Windows – open the Microsoft Store and search for DBeaver. On a Mac, you’ll need to go to the DBeaver website to download and install it.
When it’s installed, launch DBeaver – if you see a pop-up showing you a “Tip of the day”, just close it.
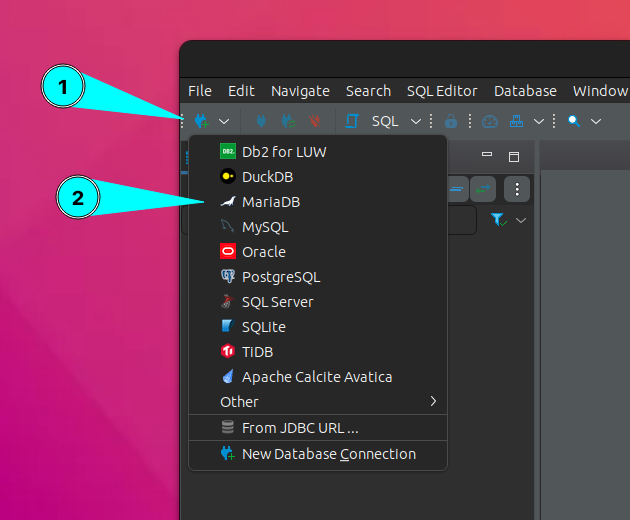
Create a new connection to your database server by clicking the New Connection button and selecting “MariaDB” from the drop-down list.
To configure the connection, we need to make sure that the server is “localhost” on the default port (3306). Set the user name to “root” and enter the MariaDB root password you created when you secured your database server. Then click “Test Connection” to verify the settings. You’ll probably be prompted to install a database driver – that’s fine.
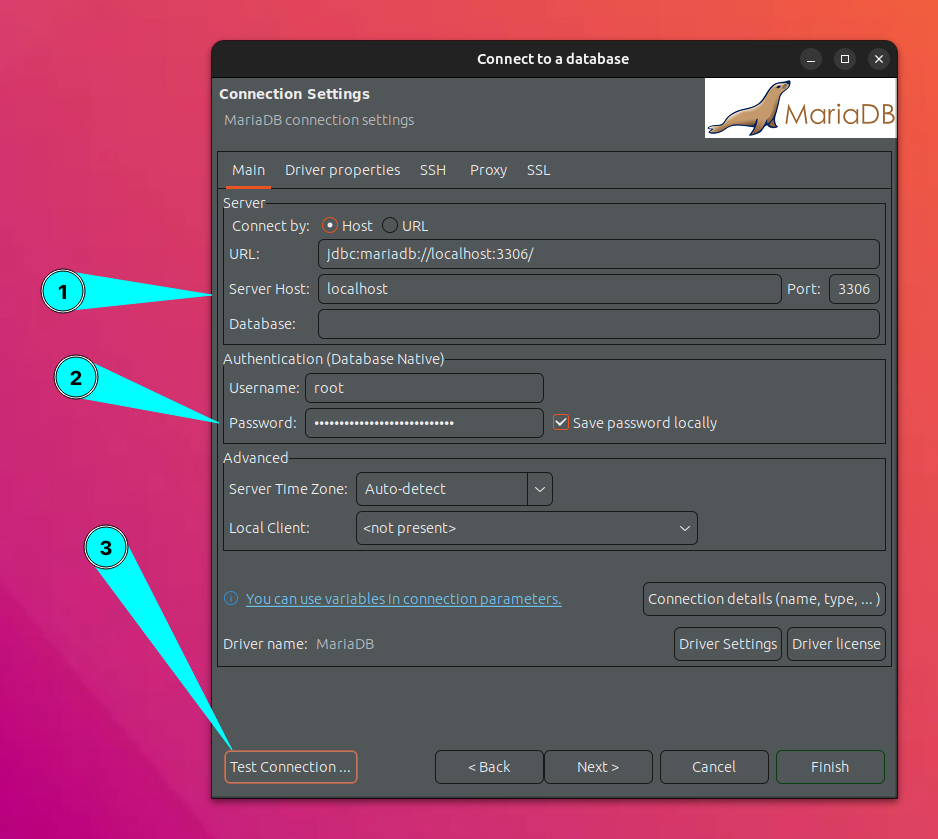
If the Connection Test is successful, click “Finish” to create the connection. But if the Connection Test fails, check:
- MySQL/MariaDB Server is started in the XAMPP Control Panel
- Check that your root password is entered correctly
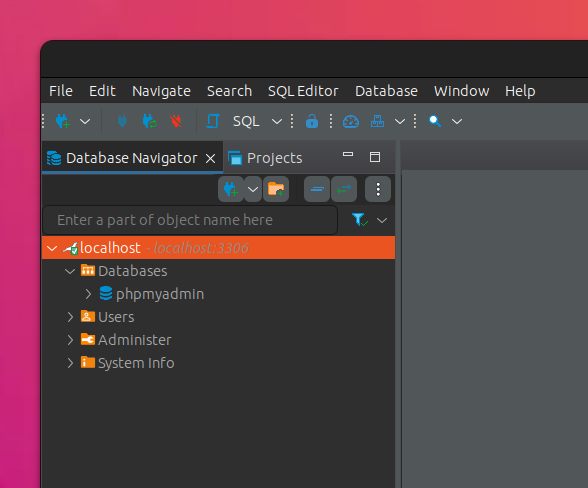
Now you’ve created a root connection to the local database server, you can explore the databases and resources. This is where we’ll create our WordPress databases later.
That’s the database server configured, and we can connect to it as root (so we can create databases) 😎 👍
